The Art of the Finish: The Complete Guide to Harvesting and Curing
You’ve put months of care into your organic garden—now it’s time to bring that harvest home properly. Whether you’re growing in a high-tech tent or a backyard in the Canadian wild, this guide will ensure your flowers are smooth, potent, and shelf-stable.
1. The Pre-Harvest Fade: Organic vs. Chemical
Flushing is a myth in organic soil, but a necessity in salt-based grows. Here’s why:
- The Chemical Flush: If you use salt-based mineral nutrients, growers often “flush” with heavy water for 7–10 days to pull residual salts out of the plant tissue. Failure to do this often leads to harsh smoke and black, “sparky” ash.
- The Organic “Fade”: In a true organic setup, we don’t “flush” the soil—we let the plant naturally transition. About two weeks before harvest, stop adding any liquid supplements or top-dressings. Continue watering with plain, pH-balanced water. This allows the plant to use up the remaining nutrients in the soil and its own leaves.
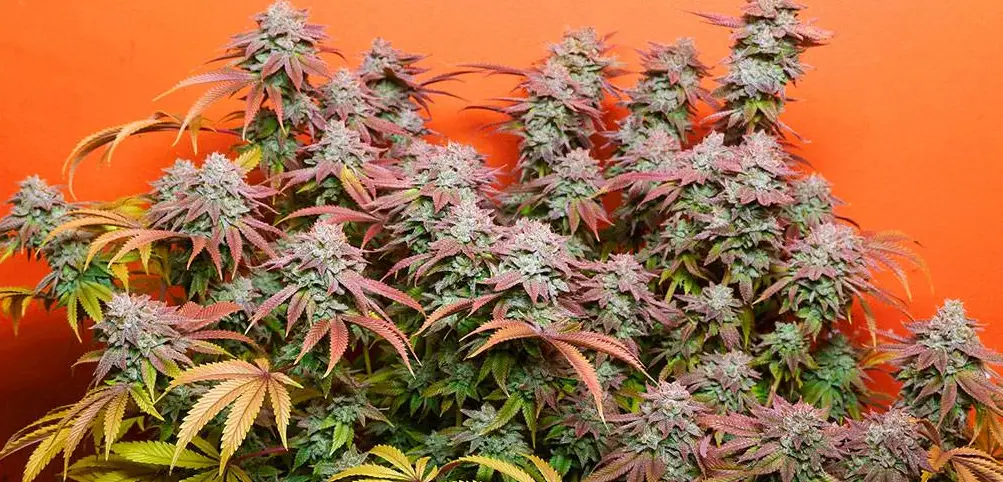
The Result: You’re looking for a beautiful “Autumn Fade,” where the large fan leaves turn yellow, purple, or red. This is the sign of a clean, organic crop that will burn with a light grey ash and a pure terpene profile.
2. Outdoor Growing: The Canadian Finish
Growing outdoors in Canada is a race against the elements. October can be a rollercoaster of frost and rain.
Frost Watch & Airflow
Cannabis is tough, and a healthy plant can handle temperatures as low as -3.5°C, but a hard freeze can damage cell walls. If a deep freeze is coming and your plants are not yet ready for harvest, cover them overnight with burlap or frost blankets. Never use plastic tarps directly touching the buds, as they trap moisture.
To help your plant win the race, practice strategic defoliation. Mid-way through flowering, remove the large fan leaves that are shading the middle of the plant or “clumping” together. You want the plant to be “breathable” so that wind can move through the colas, preventing stagnant pockets of moisture where mold loves to hide.
Spotting Bud Rot (Botrytis)
Bud rot thrives in cool, damp weather. Look for a single leaf on a big bud that suddenly turns brown or “wilts” overnight. If you gently pull that leaf and it slides right out, or if you see a “fuzzy” grey patch inside the bud, you have rot.
The “Aggressive Removal” Rule:
Bud rot spreads via invisible spores. If you find a spot, do not hesitate:
- Cut the entire branch off at least 3 inches below the visible rot.
- Do not let the rotted piece touch healthy buds.
- Immediately bag the infected piece and move it away from your garden.
- Sterilize your scissors with rubbing alcohol before making another cut.
3. The Chop: Timing the Trichomes
Don’t guess. Look at the mushroom-shaped resin heads—the “crystals” (trichomes)—under a $20 jeweler’s loupe or a high-powered smartphone zoom. These glands are the “odometer” of your plant’s maturity:
Clear: The plant is still building its profile. Harvesting now results in a weak, short-lived effect.
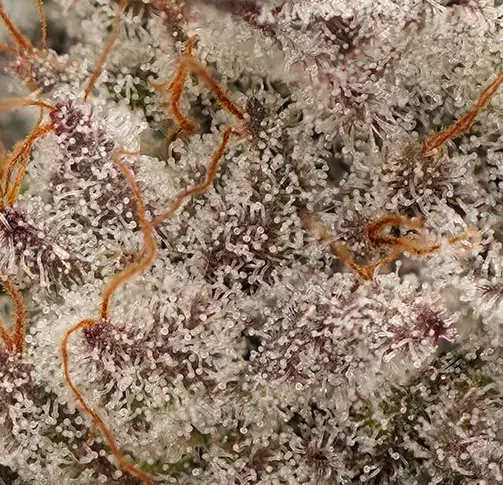
Cloudy/Milky: This is peak THC. If you’re looking for maximum potency and an uplifting, cerebral “head” effect, this is your window. Strains like our Durban Poison thrive when harvested at peak milkiness.
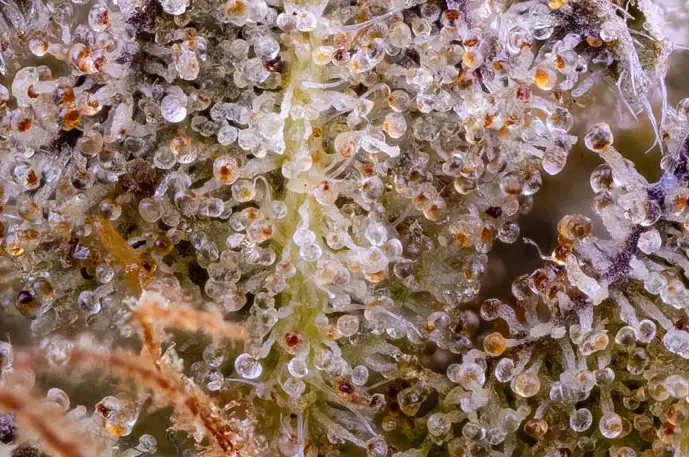
Amber (10–20%): The “Goldilocks” zone. Amber indicates that some THC is transitioning into CBN, providing a more relaxed, full-bodied, and medicinal effect which is perfect for Northern Lights.
The Flush Factor: Remember, if you are growing organically, you want to see these trichome changes coincide with your “Autumn Fade.” When the trichomes are 10% amber and the large fan leaves have yellowed and “given up” their energy to the buds, you’ve reached the finish line. But what if the calendar says it’s time, but the crystals don’t?
4. The “Mercy Kill”: When to Give Up on Perfection
Most grow guides are written by people in California or Spain. They talk about waiting for that “perfect 20% amber” like you have all the time in the world. In Canada—specifically if you have a late-flowering phenotype or a backyard that doesn’t get 10 hours of blazing sun—Nature often makes the harvest decision for you.
If you are staring at clear trichomes in mid-October and the forecast looks grim, here is how to know when to pull the trigger and “Mercy Kill” the crop.
The 48-Hour Rain Rule
If your buds are thick and you see a forecast of two or three days of “cold and drizzly” with temperatures staying below 10°C, start to chop now. In these conditions, the plant isn’t “ripening”—it’s just a giant sponge. Without sun and heat to evaporate that moisture, Botrytis (bud rot) can destroy 50% of your crop in a single weekend. It is better to have a 100% yield of “clear/milky” trichomes than a 20% yield of “perfect” buds and a garbage bag full of mold.
The “Surgical Strike”: The Partial Harvest
You don’t have to kill the whole plant at once. If your top colas look “passable” but the lower branches (the “larf”) are still pale and immature, use a staggered harvest:
- Take the Tops: Cut the main, ripe colas. This secures your “insurance” harvest—the best quality you’re going to get.
- The Second Chance: With the top canopy gone, light can finally hit those lower branches. If the weather forecast has a “sunny break” coming, leave the bottom 50% of the plant standing.
- The Risk: Only do this if mold isn’t already present. If you see rot on the tops, it’s already in the stems; take the whole plant and get out.
Founder’s Insight: The Shady Backyard Struggle
“I’ve been there. My own backyard is heavily shaded, and my plants always flower slower than the guys in the open country. Almost every year, I have to choose between ‘perfect’ weed that doesn’t exist yet and ‘safe’ weed that needs to be chopped before the frost hits. I’ve learned that a slightly early harvest beats a frozen, mushy, moldy one 100% of the time. Don’t let the quest for amber crystals ruin your winter stash.”
The “Hard Freeze” vs. “Light Frost”
- Light Frost (0°C to -3°C): Your plants can usually handle this. It might even trigger a beautiful purple “fade” as the plant panics and throws out last-minute resin.
- The Hard Freeze (-4°C or lower): This is the end. At this temperature, the water inside the plant cells freezes and expands, bursting the cell walls. When the sun comes up and the plant thaws, it will turn into a pile of brown, mushy slime. If a “Hard Freeze” warning is issued and your plants aren’t covered, get the scissors.
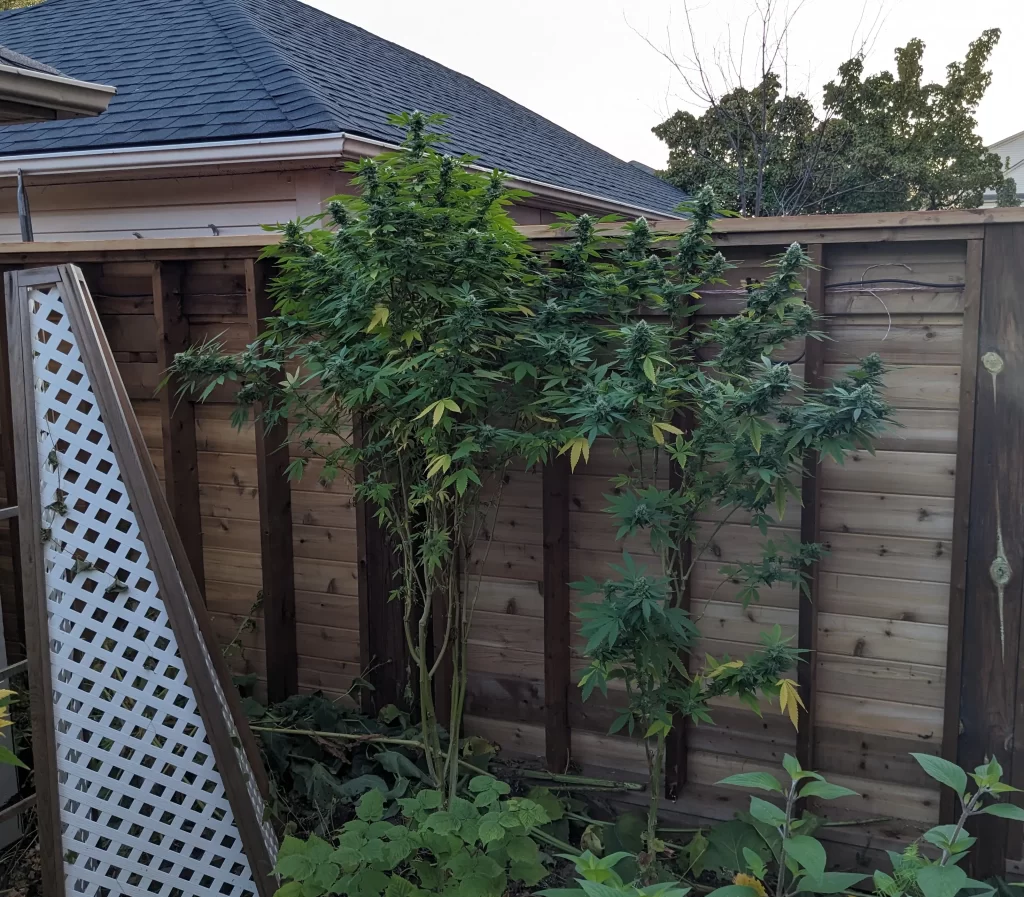
The Reality of the “Shady Backyard”
If your yard only gets 4–5 hours of direct sun, your plants will flower slower. By late October, the sun is too low in the sky and the intensity (PAR) isn’t high enough to actually “finish” the chemistry of the plant.
If the plant has stopped drinking water and you haven’t seen a new white hair (pistil) in a week, the plant has essentially “stalled.” It’s not getting any more potent; it’s just sitting there getting older and weaker. Take the win, chop the plant, and move to the drying room.
The Silver Lining: The “Zippy” High
Harvesting “early” (when trichomes are mostly clear or milky) isn’t a failure. While you might miss out on that heavy, “couch-lock” medicinal effect of amber trichomes, early-harvest weed is often:
- More uplifting and cerebral.
- More flavorful (some terpenes degrade as the plant over-matures).
- Perfect for daytime use.
The Bottom Line: In Canada, a “successful” harvest is any harvest that makes it into the drying room without rot or frost damage. Don’t let “perfect” be the enemy of “good.”
5. The Trim: Manicuring Your Masterpiece
Trimming removes excess plant material that can make the smoke harsh. You’ll be dealing with two types of leaves:
- Fan Leaves: These are the large, iconic leaves. Pluck these by hand 2–3 days before your planned harvest, or do this as you are actively harvesting.
- Sugar Leaves: These are the small, resin-coated leaves poking out from between the buds. While they contain “sugar” (trichomes), too many of them in your jar will lead to a “grassy” flavor.
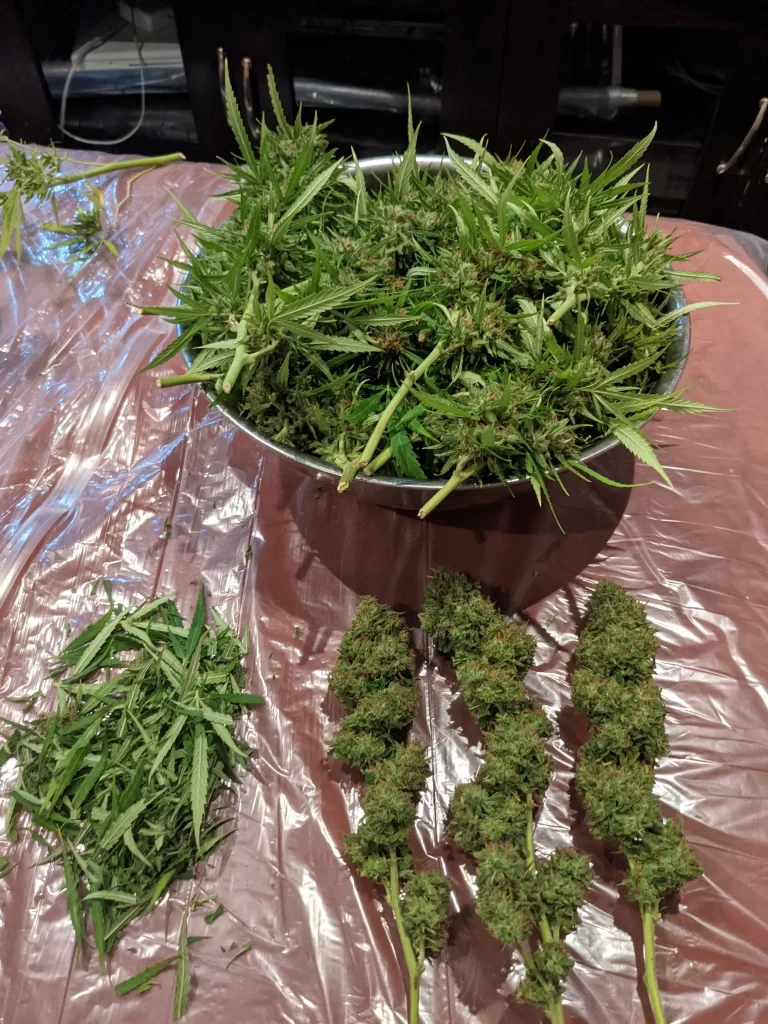
Choose Your Method: Wet vs. Dry
- Wet Trim (Immediately after chopping): You trim off both fan and sugar leaves while they are still turgid. This is best for high-humidity environments where you want to reduce the risk of mold during drying.
- Dry Trim (The Connoisseur’s Choice): You remove only the large fan leaves and hang the whole plant to dry for 10–14 days, trimming the sugar leaves once dry. This is best for low-humidity environments (like a Canadian winter indoors), as the leaves act as a buffer to slow the drying process and preserve delicate terpenes.
Keep your “trim”!
Since you’ve grown organically, these sugar leaves are clean and potent—perfect for making your own butter, oils, or tinctures.
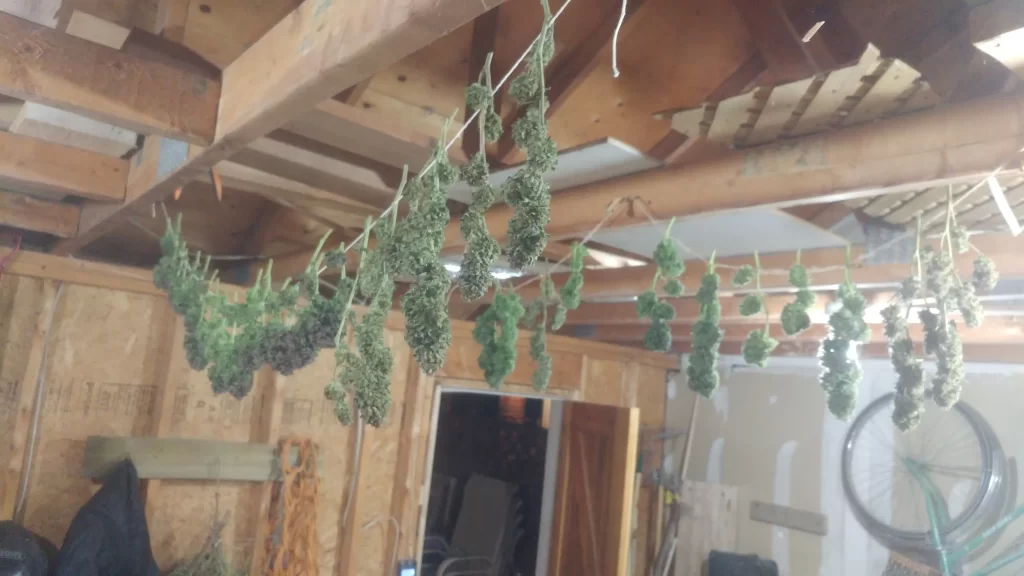
6. Drying: The Goal vs. Reality
The “Gold Standard” for drying is the 60/60 Rule: 60°F (15°C) and 60% humidity. This slow-and-steady approach preserves the most flavor. However, life isn’t always a laboratory. If you can’t hit 60/60, aim for this “Safe Zone”:
- Ideal Temperature: 15°C to 21°C
- Ideal Humidity: 45% to 62%
- Too Dry? If your humidity is low, leave more leaves on the plant during hanging to slow the drying down.
- Too Humid? Increase airflow with a fan (but never point it directly at the buds) to ensure moisture doesn’t sit on the flowers.
- The Snap Test: Your drying is done when a medium-sized stem snaps cleanly instead of just folding or “kinking.” This usually takes 7–12 days.
7. Curing: The Final Transformation
Once your stems pass the snap test, the “aging” phase—the cure—begins. This is where harsh chlorophyll breaks down and the true flavor profile emerges.
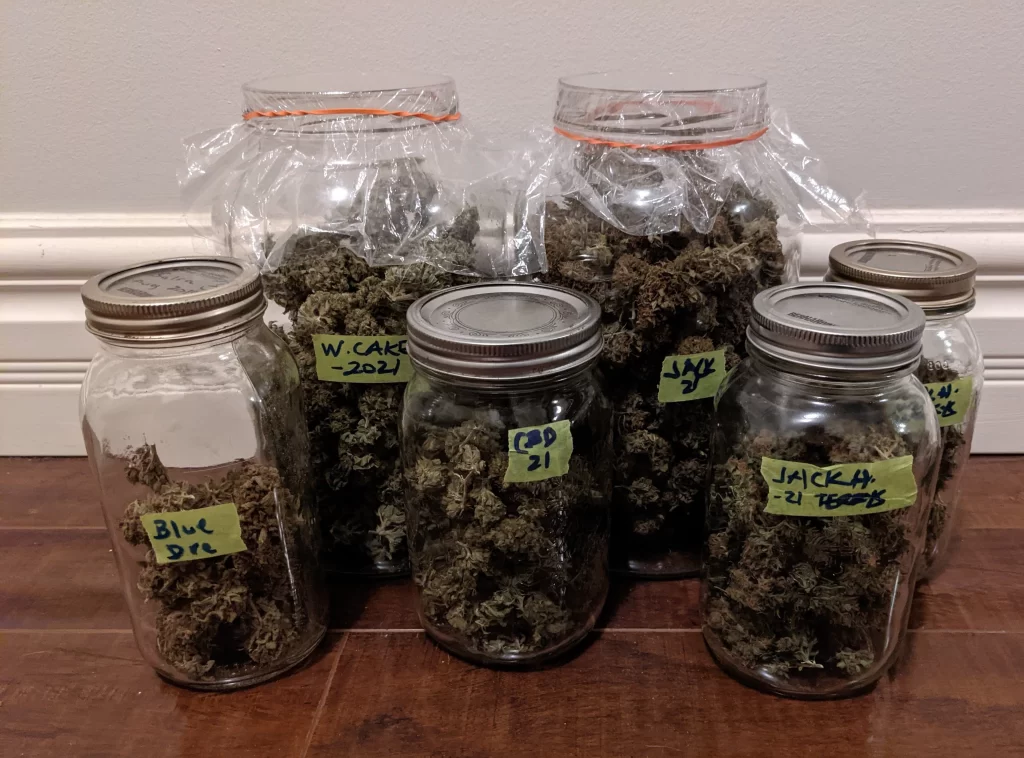
- Jarring Up: Place your trimmed buds into glass Mason jars. Fill them about 75% full so the buds have room to move.
- The Burp & Tumble: For the first week, open the jars for a few minutes once a day. Gently tumble or roll the buds to change the contact points. This prevents “flat spots” and ensures no moisture is trapped where buds are pressed together.
- The Scent Check: If you smell even a hint of ammonia, leave the lid off for an hour—it means they are still a bit too wet.
- The Long Game: After the first week, you only need to burp them once every few days. In the second week you can scale back to burping every 4-5 days. After 3–4 weeks, the cure is complete. Once complete, you can leave your sealed jars closed for the long haul.
- The Final Rest: Store your finished jars in a cool, dark place like a cupboard or closet. Avoid spots with temperature swings or direct sunlight, as heat and light will degrade your potency over time. Keep them upright, stay patient, and enjoy the fruits of your labor!
Once your jars are sealed, it’s time to start your next garden. Our Quick Start Guide can help you get your new clones established while this harvest cures.
Humidity Packs:
Consider tossing a 62% humidity pack (like Boveda) into the jar once the cure is stable. This keeps the environment perfect indefinitely and protects those precious organic terpenes.
One Jar Ends, Another Begins
The best time to start your next grow was two weeks ago; the second best time is today. Don’t get caught with an empty stash. Pick your next favourite strain and keep the cycle going.
SHOP PREMIUM CLONES